
# Organisation
An organisation is the workspace for a group of users. All projects, dashboards, tasks, reports and employees belong to the organisation.
# General
Name: name of the organisation, which is also part of the URL and of security applications. This name cannot be changed. Description: this is the name shown in the user interface, reports, etc., and it can be changed.
# Corporate identity
Logo, primary and secondary colour: corporate identity for the user interface and reports.
# Saving changes
Editing an item works the same way in all modules:
- When you edit and save an item, you stay on the item (you are no longer sent back to the overview automatically). At the top left you can navigate to the overview yourself.
- The message "There are unsaved changes" only appears when you have actually changed something.
- If you try to navigate away with unsaved changes, you get a confirmation ("are you sure?") so that you do not lose your changes unintentionally.
# Settings
A number of settings can be configured per organisation.
| Setting | Value | Default value |
|---|---|---|
| Automatically delete system events | Months | 1 |
| Automatically delete non-system events | Months | 12 |
| Corporate identity background colour | RGB | ffb3b3 |
| Corporate identity foreground colour | RGB | fgb2s1 |
| Corporate identity logo | png, jpg | logo.png |
| Default time span trend chart measurement | Predefined periods | This month |
| Default time span dashboards | Predefined periods | Past week |
# Backup and restore
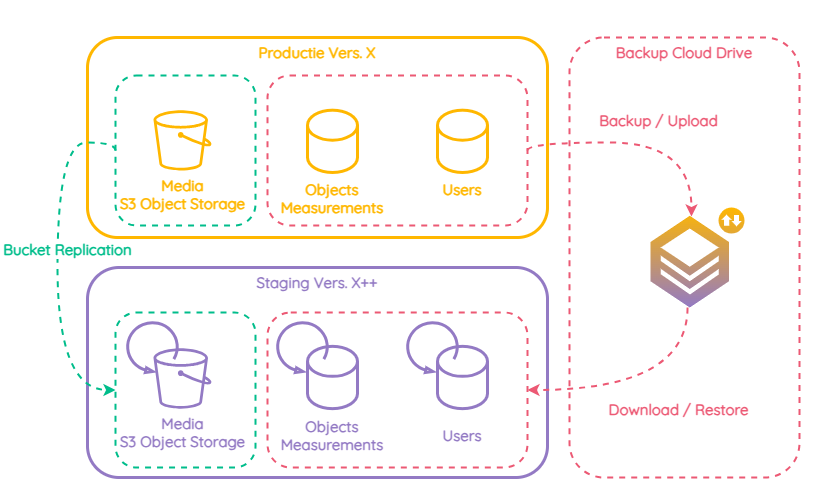
Eye on Data supports setting up automatic backups and restores. The backup contains all data sets of the various components:
- objects and measurements
- user data
- media
On a regular basis (typically daily) a backup of the production environment is created and then restored on the staging environment. Besides preserving the data, this also makes it possible to validate upcoming software versions on the staging environment with recent data.
PLEASE NOTE
When a backup is restored, the settings for backup/restore are not taken over. Alarms are also deactivated automatically after a backup has been restored.
# Methods
# Backup/restore
For the databases with objects and measurements and with user data, the following steps apply. For each of these steps an info or error message is also made available by the underlying process:
Backup:
- Backup of all data
- Backup of all user data
- Compress the backup
- Upload the backup to the cloud
Restore:
- Download the backup from the cloud
- Unpack the backup
- Restore all data
- Restore all users
# Replication
For the data in media storage, a replication process runs continuously in the background from the production environment to the staging environment.
# Settings
The configuration and the system events are available to system administrators of the Eye on Data platform and support the following settings:
# Automatic backups
- Automatically delete backups after a number of days: number of backups kept in the cloud for this environment. Note that 1 backup is kept locally.
- Schedule frequency: frequency for running the automatic backup, in CRON notation.
- Cloud backup location: by default this is not filled in and the backup ends up in a folder of your organisation. If desired, a subfolder can be created per environment (staging/production).
- Cloud synchronisation: when active, the backup is compressed and moved to the cloud.
# Automatic restore
- Schedule frequency: frequency for running the automatic restore, in CRON notation.
- Cloud backup location: by default this is not filled in and the backup ends up in a folder of your organisation. If desired, a subfolder can be created per environment (staging/production).
- Last restored version: name and location of the file that was last restored on this environment.
INFO
While a backup is being restored it is not possible to make changes, and the following message appears: 'Backup is being restored: the backup is being restored now, changes made in the meantime will not be saved.'
# Overview and actions
In the Cloud Backups overview you will find a list of the backups available in the cloud environment, with the most recent backups at the top. The following details are available:
- File name
- Size
- Location (subfolder)
- Creation date
# Manual restore
The last column allows you to restore the selected backup manually on this environment. Before you can carry out this action, you are shown the following message: 'Are you sure you want to restore the backup? Restoring can take a few minutes.'
# SSO
Eye on Data IDP optionally supports Single Sign-On (SSO) for organisations that use an identity provider for authentication.
# IDP configuration
# Microsoft Azure Active Directory
For the steps below we assume that an Azure Active Directory is already available.
Please note: this configuration is for one tenant and per environment (staging/production).
# Microsoft Azure configuration
- Application registration
Note: you need administrator rights to create an app registration.
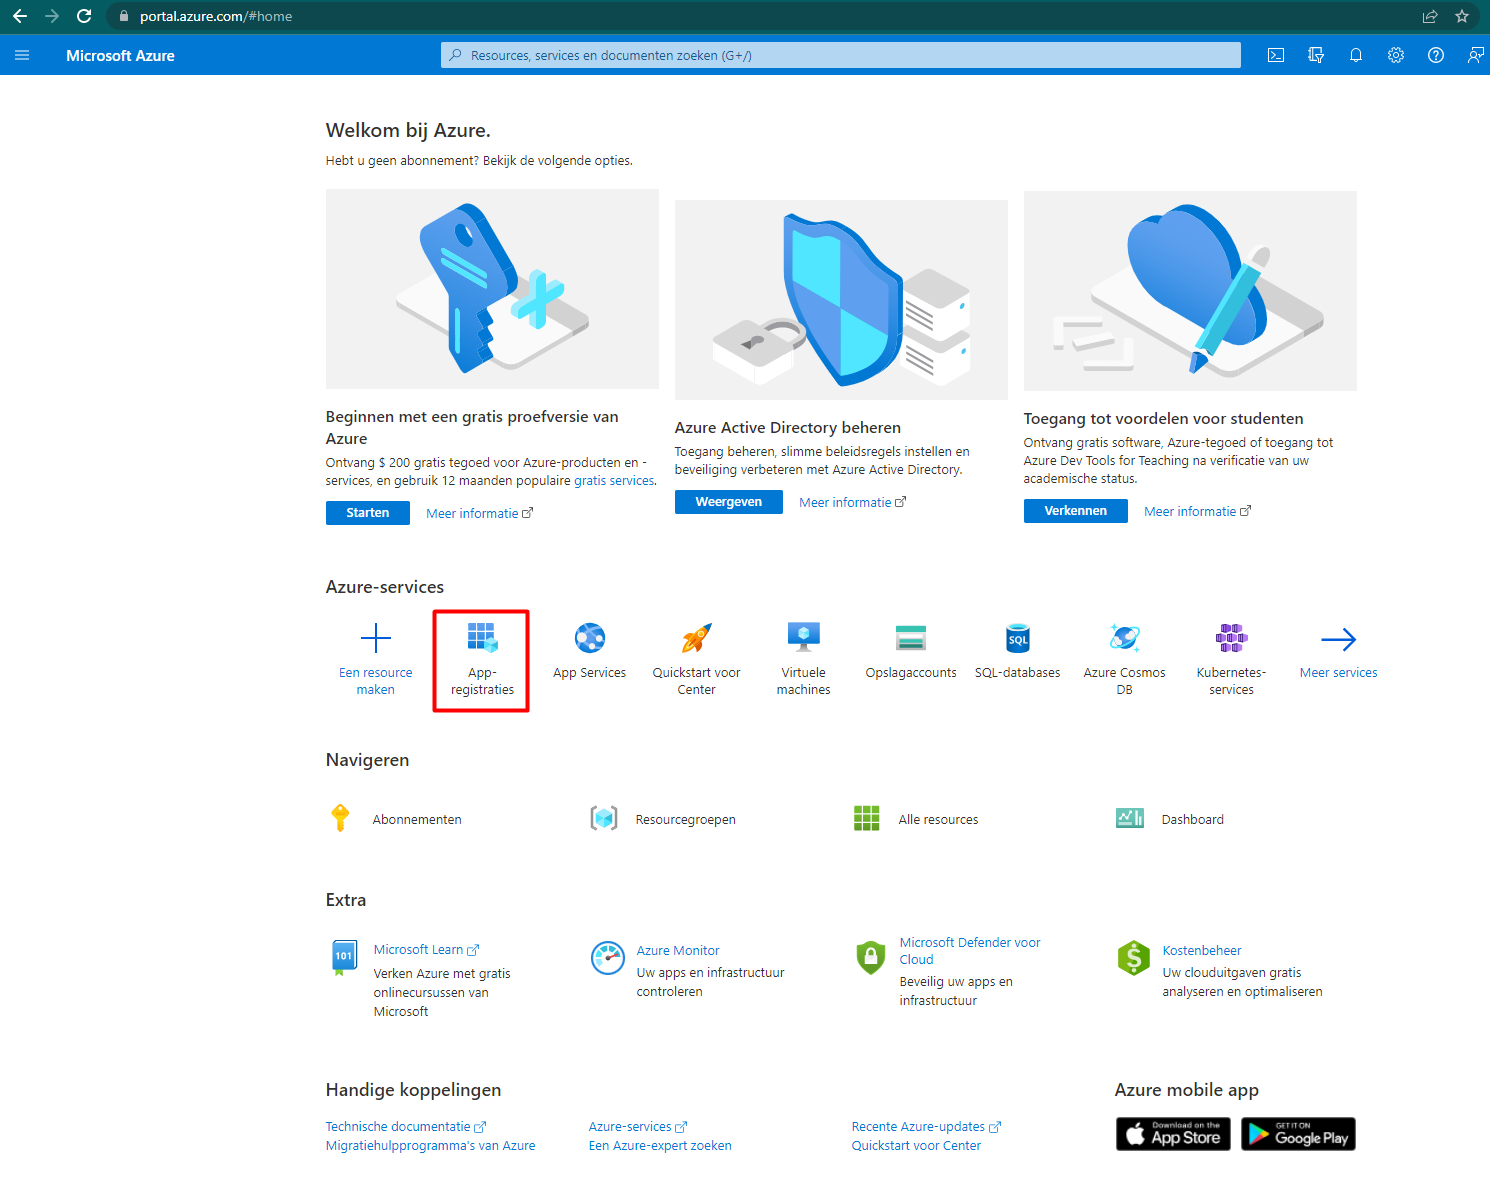
Navigate to https://portal.azure.com and select the option App registrations under the Azure services section.
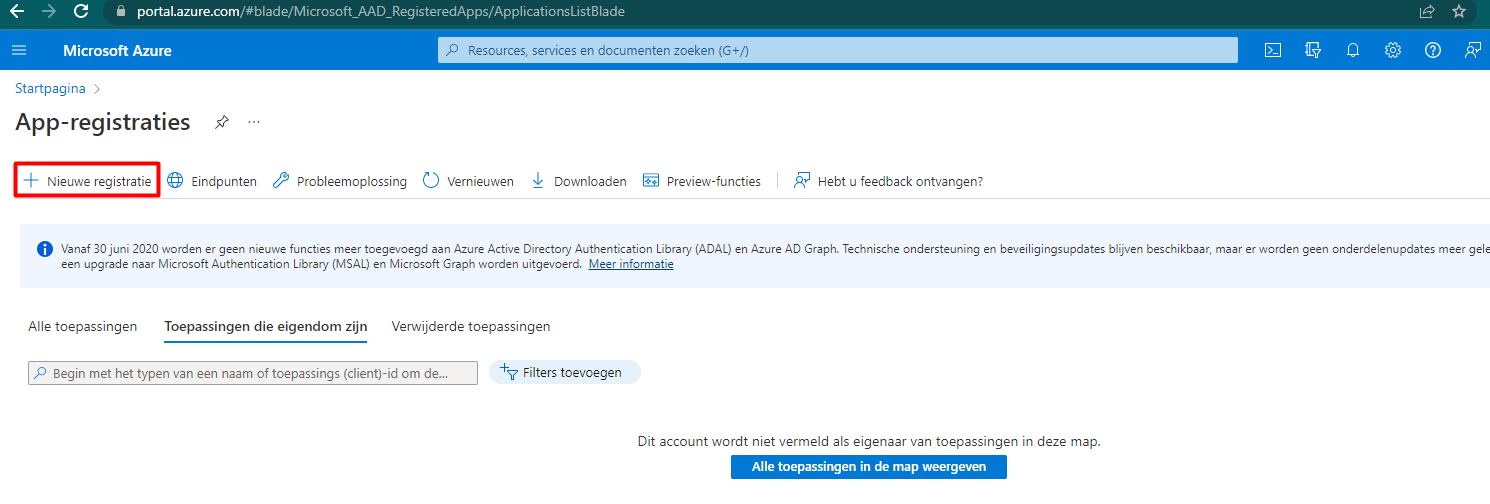
- Select the option New registration in the top left corner.
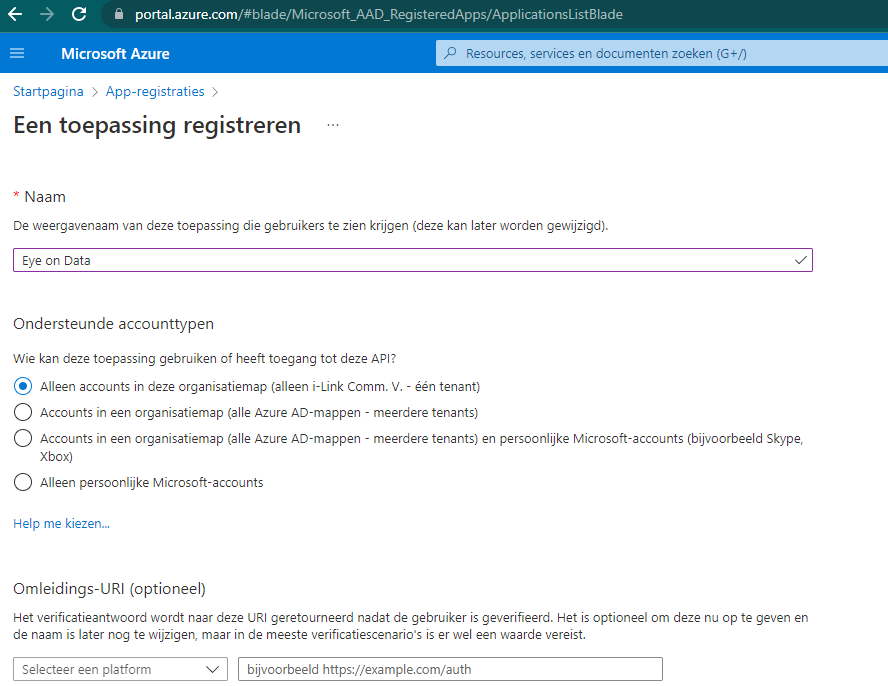
- Enter a name - Eye on Data {environment} - for the application you are registering and select the single-tenant account type. Then select the register button.
staging environment:
- Set the redirect URI to: https://iam.portal.staging.eyeondata.eu/auth/realms/{organisation}/broker/oidc/endpoint
- Set the logout URL to: https://{organisation}.portal.staging.eyeondata.eu/logout
production environment:
Set the redirect URI to: https://iam.production.eyeondata.eu/auth/realms/{organisation}/broker/oidc/endpoint
Set the logout URL to: https://{organisation}.eyeondata.eu/logout
Enable access tokens and ID tokens
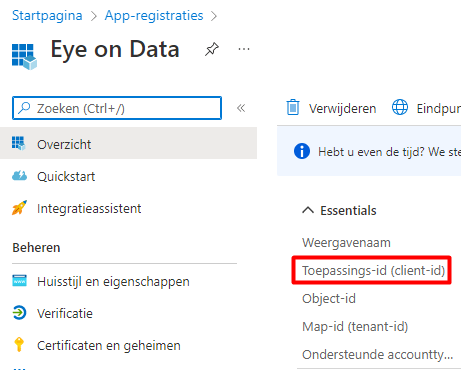
- After you have registered your application, you return to the overview page of the application registration.
Copy your Application (client) ID, as you will need it later when creating your identity provider in the Eye on Data administration console.
- Create a client secret
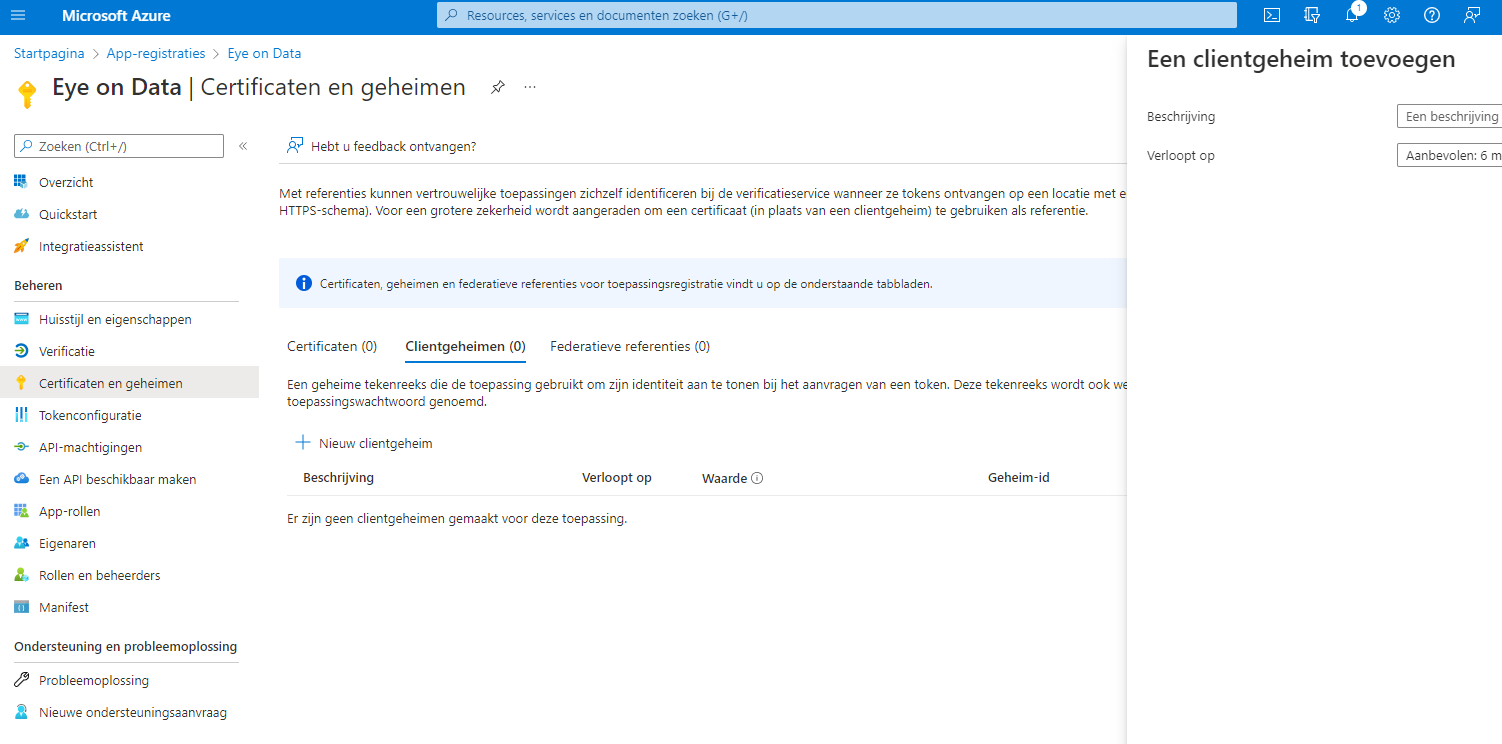
Navigate to the Certificates and secrets section. Create a new client secret and copy the generated client secret value, as you have to use it when setting up your identity provider in the Eye on Data administration console.
Enter a description - Eye on Data {environment} - and set the desired validity period (24 months).
Copy the value of the client secret, which you will need later when configuring Eye on Data.
- Endpoints
Navigate back to the App registrations page and select the endpoints at the top.
Copy the OpenID Connect endpoint (OpenID Connect metadata document).
- Configuration
Give the Eye on Data administrator the following information per environment:
- Application (client) ID
- Client secret
- OpenID Connect endpoint
# Structure
organisation
|___department 1 (Sales and Marketing)
|   |___division 1 (Sales)
|   |   |___team Pre-sales (managers: user 1)
|   |   |   |___user 1
|   |   |   |___user 2
|   |   |___team Sales (managers: user 1, user 3)
|   |   |   |___user 1
|   |   |   |___user 3
|   |   |   |___user 4
|   |___division 2 (Marketing)
|   |   |___team Marketing (managers: user 5)
|   |       |___user 5
|   |       |___user 6
|___department 2 (Operations)
    |___division 3 (Information Technologies)
        |___team IT (managers: user 9)
            |___user 7
            |___user 8
Organisational
- Department: parts of the organisation (possibly referring to different legal entities)
- Division: department, part of a department
- Team: group of users with one or more managers
- Users: co-workers of the organisation
Geographical
- Site: locations of the organisation
- Rooms: all rooms of the organisation
Accounting
- Cost centres
Note that for external surveys in which the department, division, site, etc. of external (non Eye on Data) organisations is surveyed, this is completely separate from the internal Eye on Data organisation configuration above, and in those cases it has to be seen as a measurement that is surveyed by means of a list of possible values.
An exception to this is team and manager: it is possible to create external teams with external managers. If an external employee reports about an external manager, the relation can be looked up this way. In that case an external employee is added to one or more external teams. These external teams can have one or more managers (external employees as well). For filtering in reports and dashboards, a list of teams and their managers can be shown. If the manager has been selected, the data can also be looked up this way for the logged-in user.
# Connections
# Spryng
The Spryng connection makes it possible to send alarms by SMS.
You need to register an API key for this.
# SMTP
The SMTP connection makes it possible to send reports through your own mailbox.
The following settings are needed for this:
- Server
- Name
- E-mail address
- User name
- Password
- Port
- TLS/SSL
Users →